Every Yosemite summer season begins with a flurry of spring hikes that lead to our busy schedule from June to October. Within those months, I will be leading the Half Dome hike for several of our guests. As an expert on Yosemite and Half Dome, I like to share several pointers along the way that give Half Dome hikers the best opportunity for success on that trek. I will now share my Half Dome Hiking Guide with time tested tips along with some new ideas to provide safety for a successful journey up the Half Dome cables.
 Half Dome Hiking Guide
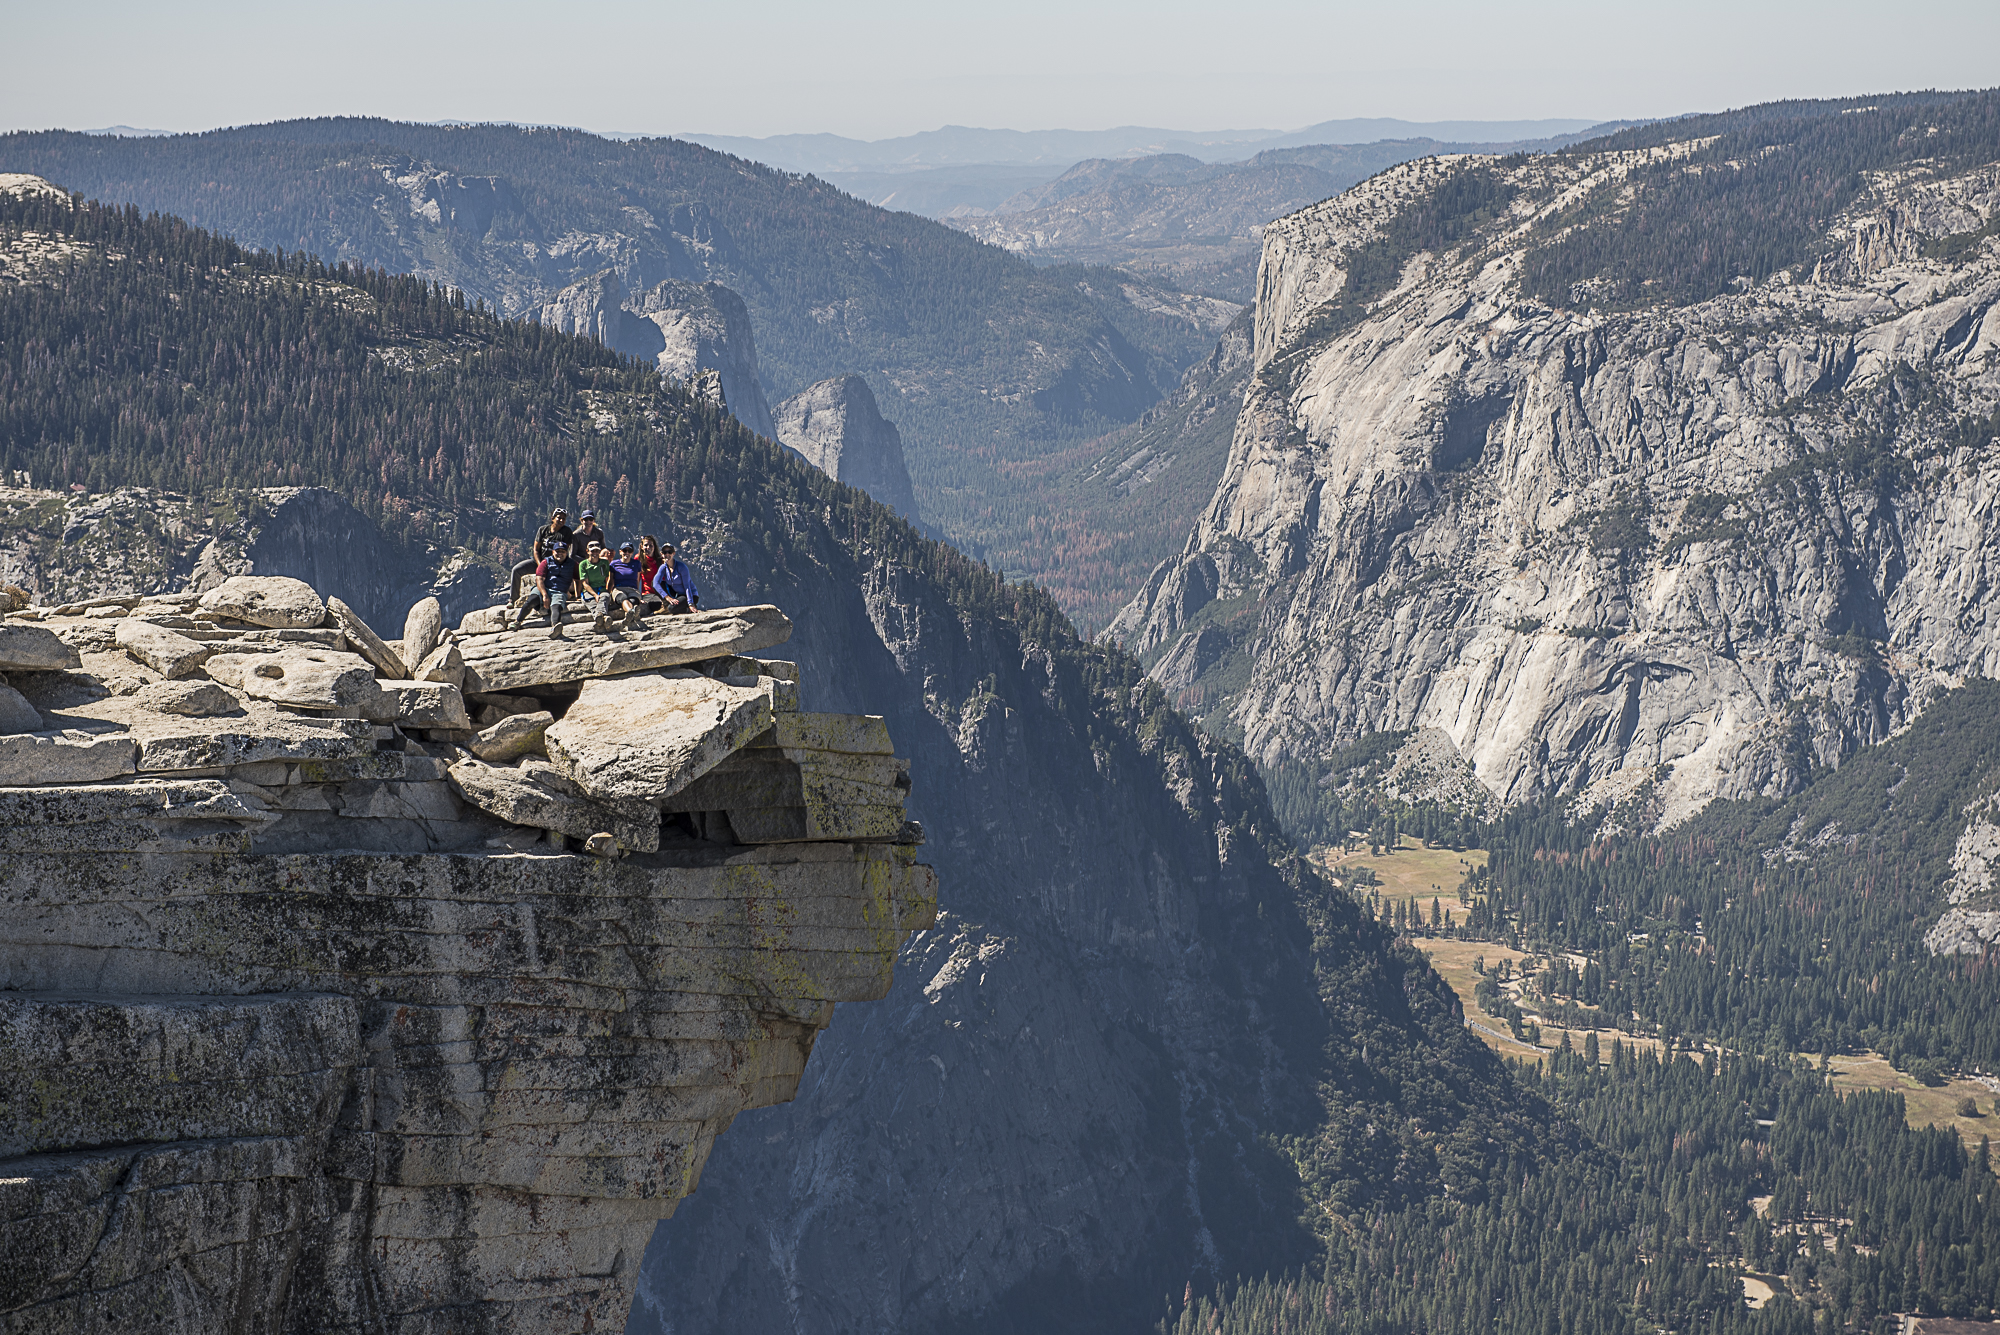
Preparation is important for any journey, especially one that requires you to hike roughly sixteen miles (round trip) and gain approximately 5,000 feet of elevation in a span of roughly twelve hours. The Half Dome hike requires permits to reach the summit, and a Yosemite Park Ranger checks them at Sub Dome. If you do not have a permit, you will not be able to pass. Permits for the preseason lottery can be obtained at Recreation.gov during the month of March each year and then again during a secondary lottery if you apply forty-eight hours before your summit date. These permits are limited to approximately 300 hikers per day. Each year, YExplore also receive a limited number of permits through the lottery that we can offer if you wish to have a guided Half Dome experience. Here are the remaining one day Half Dome permits we have available as of May 2018: June 10 -1 permit, June 14 – 1 permit, June 19 – 4 permits, July 3 – 2 permits, July 11 – 2 permits, July 20 – 2 permits, August 25 – 1 permit, September 5 – 1 permit. Please call +1 209-532-7014 for availability.
It is very important to properly train in the weeks leading up to your summit day. This Half Dome Hiking Guide recommends a three to six month program of cardio training. Any activities that may include hiking, walking, running, cycling, treadmill, stair climbing, elliptical machine, or swimming would be ideal. Remember to gradually increase your workload as your date gets closer. Also be advised that Half Dome is 8,842 feet above sea level. While it is not necessary to train at elevation, it is very helpful if you can. You should be able to comfortably spend 8-12 hours on a trail in the weeks leading up to your big day. Many people summit this peak coming from areas with no elevation like Florida or Singapore. Do not be discouraged but definitely build your endurance before you arrive. Don’t forget to also build up arm strength for this hike. The cable route at the end requires the ability to pull yourself up the last 600 feet of the trail. You will still rely on your leg strength, but the cables will be awkward in some areas that will require sole reliance on that arm strength. I recommend at least 10-50 push ups each day along with some weight training with dumbbells. *Please consult your physician to ask if this altitude may adversely affect you or if you have any condition like high blood pressure, COPD, asthma, or others that may limit your ability to complete a strenuous activity at this level of elevation.
Diet is also important during training. I like to eat healthy and stay well hydrated the day prior to the hike. I try to avoid any greasy fried foods that could potentially slow me down on the 16+ mile trek. I also try to avoid red meats. For dinner I normally try to eat pasta or a piece of grilled chicken and make sure to load up on carbohydrates on the eve of the hike. I also drink about a gallon of water on the day before each Half Dome hike.
On summit day, I drink about 20 ounces of water immediately after waking up. I will eat some yogurt or oatmeal with berries for breakfast. I strongly believe in prehydrating for this hike so my muscles are good and loose. Dehydration can lead to cramping and muscle pulls. This must be avoided at all costs. Lately, I have been also powering my hike by eating a blueberry or chocolate chip muffin along with my standard banana at the trailhead. The banana is for valuable electrolytes and the muffin is for a little extra motivation in the dawn hours of the day. Both work extremely well.
I typically bring at least 120 ounces of water on a summer hike. I will also bring a Katadyn Hiker water filter. As a Half Dome Hiking Guide, my preference is to carry more to save time without having to stop to filter water as we approach the summit. I believe the time lost gathering water near the halfway point of the ascent is not worth the trade off. Some people do not like to carry more water, but I believe that your pack becomes lighter if you drink regularly as the day goes by. So many people run out of water before they even make the cables, and I have seen many people have negative physical reactions because of their lack of preparation. It is so vital to stay hydrated on this hike that I recommend at least 150 oz of fluids for the day. When you bring a water filter, it gives you a good opportunity to rest and soak your tired feet in the cool Merced River while you pump before you make it down to the Valley. An added bottle of sports drink can give you an energy boost that I normally recommend for the final two miles of the hike. I strongly suggest not using the heavily marketed high energy drinks that are loaded with caffeine which can cause dehydration and cramping.
As a Half Dome Hiking Guide I recommend a good balance of protein and carbohydrates to eat throughout the day. Your food bag should contain a good mix of essentials like protein bars and other items you will enjoy eating. Lately, I have been enjoying an RxBar on each hike, and to no one’s surprise, my favorite flavor is the Chocolate Sea Salt. Each bar has 12g of protein. This is lower than a Clif Builder Bar (20g) which I also would recommend, but I prefer the taste of the RxBar. Other sources of protein I bring are 2 hard boiled eggs and a trail mix with any type of nuts. I also like to bring some fruit. Peaches are the best, but an apple or orange will admittedly hold up a little better unless the peaches are in a can. Pretzels and crackers are also staples of my lunch sack as they also provide much needed salt. You will lose a lot of salt through sweating so it is extremely important to replenish your body with electrolytes. I normally bring a turkey, salami, or peanut butter sandwich with me. I’ll sometimes bring a leftover burrito or a few slices of pizza when I need some extra motivation. I place a small ice pack in my lunch to keep everything cool on hot summer days. To me, it’s worth the extra weight. Without an ice pack, I would avoid any cheeses or condiments like mayonnaise. Also be sure to bring a lunch you really enjoy because sometimes you won’t want to eat and only bringing protein bars can be downright depressing. It will be necessary to have the energy to make the long 8+ mile descent. This is one day you really don’t need to worry about calories. Most hikers will burn about 3,000-5,000 calories on this adventure. It’s such a demanding trek that I always recommend bringing comfort foods with you like gummy bears, sour worms, Skittles, etc. I personally like dark chocolate at the top of any summit, especially Half Dome . *Lack of appetite is also a sign of dehydration and possible altitude sickness.
Half Dome Hiking Guide
Onto gear, I bring a day pack that is functional enough to carry my food, water, camera, first aid kit, and other essentials. Yes, I bring my pack all the way up the cables. Yosemite National Park strongly discourages leaving your pack unattended at the base of the cables, and you can receive a citation for it. Some people bring fanny packs to minimize what they carry, but I have seen people eliminate packing essentials just because they did not have any space left. This is a judgment call, but I would go with a light day pack. I prefer brands like Gregory or Osprey. Other essentials include a hat for sun protection, sunglasses, headlamp, light rain jacket with a hood (rain pants optional), sunscreen, hand sanitizer, and insect repellent. An extra phone charger is non essential but might be a good idea if you plan to live stream your Half Dome experience. I us a Mindshift Gear camera pack that is light and allows me to have quick access to my digital SLR. I recently purchased a Canon EOS M5 mirrorless camera to drastically cut down on weight. I like to share action shots of my guests on this hike, and the M5 has a relatively sharp 28-150 lens. The quality of photos does not compare with the sharpness of my Nikon D750, but the tradeoff of dramatically reduced weight is well worth it for these types of images. I really like the convenience using a Patagonia 30L Ascensionist pack when I’m only carrying my iPhone X. The quality of the photos are so much better than any other phone I have used so it is making it a lot easier to go even lighter for each trip.
Hiking poles help many people protect their knees on this long journey. They can be most beneficial on the descent. As a Half Dome Hiking Guide, I understand their value for added confidence but also know more energy is exerted when using them. It is completely your call, but if you use them, you may want to consider stowing them under a rock on the Sub Dome. Many careless cable climbers improperly strap them to their packs and poke people along the way. I have been prodded and almost impaled by these protruding poles. While we are on the subject of the cables, please keep all loose items inside your pack. I have seen hundreds of water bottles, cell phones, cameras, and other items take the 400+ foot fall because people thought the side pockets of their pack were secure. The only way to make sure these pieces of your property will remain protected is to zip them inside your pack.
There are 5 toilet areas along this hike but none after Little Yosemite Valley. If you do need to take a nature break outside of these areas, please be sure to be 100 feet from the trail or 200 feet from any water source. Also remember to pack out any tissue or toilet paper you use. Wag bags are required on Mt. Whitney and it would also be a good idea to bring one with you on Half Dome and remember to carry it out with you. It is required to dig a hole 6 inches deep for solid human waste. Remember, that’s only what comes out of your body. You will need a trash bag to pack out all other waste, including fruit peels, nut shells, etc. Although they may be biodegradable, they will decompose at a much slower rate at higher elevations and become very unsightly. The main reason not to leave any trash or give any food to the wildlife is to prevent them from being accustomed to human food. This can be very bad for the health of the animals and discourages them from finding their own food which causes them to starve in winter.
Half Dome Hiking Guide
I like to wear lightweight breathable clothing from head to toe for this hike. One rule of thumb for hiking is to avoid cotton at all costs. Cotton holds water and can make for an uncomfortable afternoon. I typically wear Patagonia Capilene t shirts and underwear along with a long sleeve layer to start the hike. That should be suitable for summer temperatures. I typically do not bring a fleece on this hike and will wear my rain jacket in the dawn hours that start the day when necessary. I have had success with Patagonia and Marmot jackets that are compressible. I like to wear synthetic shorts or pants as well. Several brands work well including Prana and Patagonia. Columbia is a more affordable option. As a Half Dome Hiking Guide, I like to recommend the best brands that may seem more expensive than others. The only socks I wear are Smartwool. Some people bring an extra pair of socks in their pack to have a fresh one to hike down in.
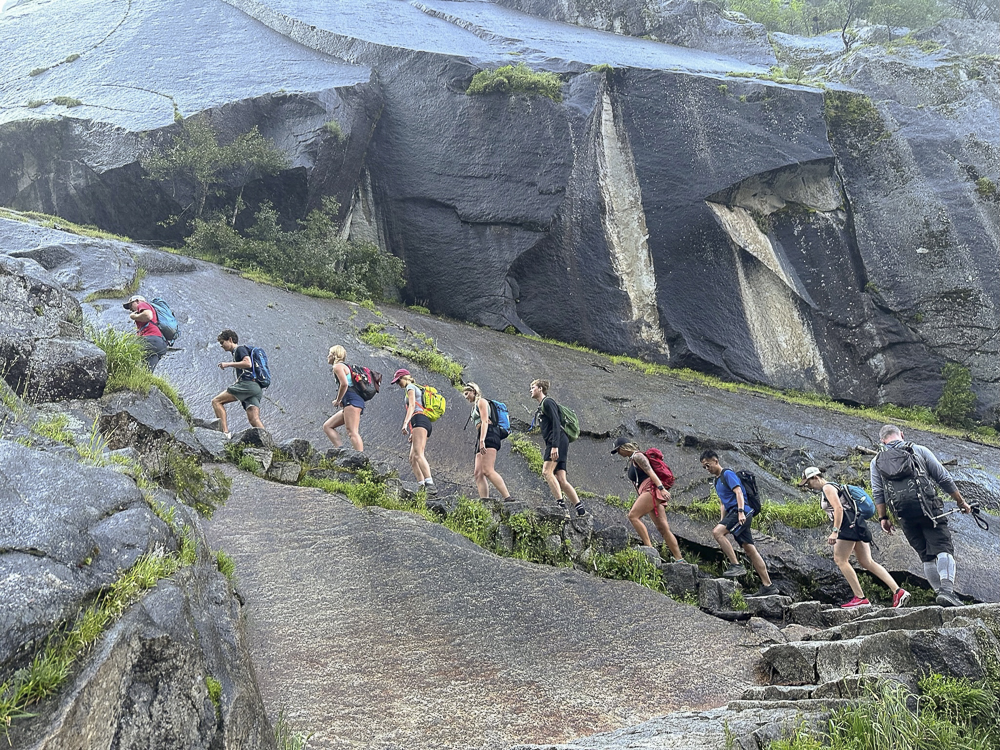
Concerning footwear, I hike in XA Pro 3D trail runners by Salomon. I wear low top trail running shoes because they provide better stability and protection against rocks while giving me the flexion for my feet that hiking boots inhibit. Many people refuse to give up their hiking boots because they are designed specifically for hiking on the granite rocks of Half Dome. These are also a very solid choice but less comfortable for me. Some sandal type shoes like Tevas and Chacos have very good gripping soles and I have friends who love them, but I personally don’t want the bare skin on my foot to be exposed on this long day. Regular tennis shoes will barely work on the hike but do not have good grip on granite that can be slick in some areas of this hike so I strongly urge hikers not to wear them. The Mist Trail and Sub Dome are extremely steep and have large granite steps. You also will need to consider you will be walking up the slick cable route where improper footwear can spoil your chances of a successful summit. Running shoes are relatively more efficient but trail runners or light hikers are even better. Please remember this for all my gear recommendations as a Half Dome Hiking Guide. I am logging thousands of miles each year and want to avoid replacing inadequate gear that may have cost significantly less but does not hold up to the challenging terrain of Yosemite National Park.
For the cables, it is important to have good gripping gloves, and I like to use nitrile coated sticky work gloves from any hardware store. These are great and very cheap. Sticky latex gloves are next best, but some people are allergic. I don’t think leather works well because hands slip pretty often. I would recommend full fingered gloves. I definitely would not recommend bike gloves or workout gloves as they normally are not made of tough enough material for the friction involved and may disintegrate on the way down. Also remember to Leave No Trace and bring out your gloves out with you after the hike. The biggest myth of the Half Dome hike is that it is a good deed to leave used sweaty gloves for other hikers. These gloves are considered trash by Yosemite National Park and thousands of gloves are hauled out by rangers and volunteers each year in large trash bags. Many of these leftover gloves are ingested by the squirrels, chipmunks, and marmots that live on the rock so leaving them behind actually harms Yosemite wildlife.
The last topic I would like to address in this Half Dome Hiking Guide is how to approach the Half Dome cables. I believe very strongly that the safest way to approach the cables is to use one cable at a time. This allows for the most efficient way to navigate the crowded cables. I have tested several methods over the years, and this works best for our groups. Using only the right cable on the ascent allows you to focus on using your leg strength without burning out your forearms. It is also a good idea to use the boards as resting spots to catch your breath for about 10-15 seconds at a time. You will need to rely on arm strength during this half hour ascent, but using both cables to pull yourself up the whole way places an unnecessary burden on the upper half of your body. I like to descend using the opposite left cable to allow for easier passage of both uphill and downhill hikers at the same time. I face uphill, lean my left hip into the cable, and watch my feet as I reach each board on the way down. Facing downhill during the descent is more dangerous because it forces you to lean forward as you build your momentum down toward the other hikers. Those who face forward and slide their feet down uncontrollably add unnecessary risk to everyone on the cables. Finally, I would strongly urge all hikers to never use the Half Dome cables during a storm or if the rock is wet or icy!
Half Dome Hiking Guide
I hope this Half Dome Hiking Guide has provided you with good information to help you prepare for your summit adventure. As a Half Dome Hiking Guide, I am humble enough to know that although I may have reached the summit of this peak more than most people, I am not the only expert on Half Dome. There are people that may disagree with some of my choices, but they are only suggestions based on what has made our groups most successful throughout the years. Being prepared should be your main focus on this and any other trip you make into the wilderness. I hope to see you out on the trails.
John P. DeGrazio is the lead adventure guide for YExplore Yosemite Adventures and regularly leads trips up Half Dome. YExplore offers Guided Half Dome hikes in Yosemite and can work with you to acquire permits in the preseason lottery in March of every year or the 48 hour lottery. We will also accommodate any group that already has acquired a permit for the hike and wishes to experience the added benefits of a guided adventure.
If you are interested to read about an exciting adventure all the way up half dome, then this would be an interesting story for you.